The Importance and Basics of Interview Lighting
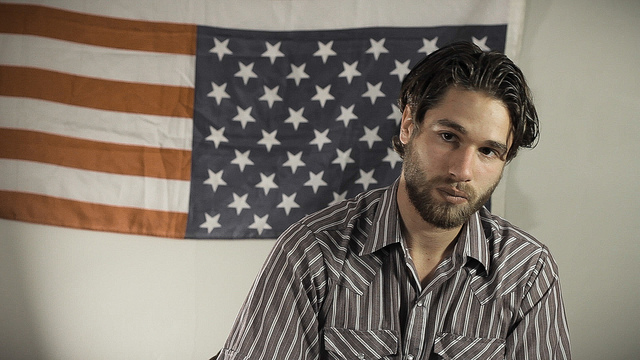
The above image is a scene from an interview I lit in 15 minutes using $50 worth of lights and equipment from the hardware store.
The basic principle of lighting is that we need lights because cameras have only a fraction of the dynamic range (distance between the shadows and highlights) of our eyes. So if what we are filming is not properly lit (i.e. our highlights, mid tones, and shadows in our scene are not in a range that our camera can pick up) then will lose detail and the camera will not be able to translate that part of the scene. You will recognize this as windows that are entirely white, faces that are too dark, and shadows that are noisy / grainy and without detail. The reason we wait until later in the day when we are filming outside so that everything is not too bright is the same reason we use lights indoors so that everything is not too dark.
Lights add an extremely important element to our production value. Lights are more important than what camera we use, what lens we have, or what we do to the color in post. Professional cinematographers will tell you they would rather shoot with a DSLR on a well lit scene than a Red or Arri on a poorly lit scene.
Lights will also drastically speed up our post-production. Imagine if we take the same lighting kit to every interview we shoot; we won’t have to worry if we are filming in a greenhouse during the golden hour or a dark factory at night. Our images from both scenes will be similar. This creates consistency across videos and saves time during color correction because we will starting from a similar point with where our colors are.
The most basic lighting setup is called 3-point lighting. It is fast, easy to setup, and I believe just what we need.

So if you have a subject, sitting in a chair, that you are interviewing, you will start with what’s known as the key light. The key light is our main light, our brightest source of light. If we are filming outside then our key light will be the sun. When you are setting up the key light, think about what side of the subject’s face you want the majority of the light to focused on and, on the reverse, where on the face you want to place shadows.
The main concepts to remember with lighting is: the bigger our light source is, the softer and more spread out it’s light will be. The closer our light source is to our subject, the stronger and more concentrated it will be and the less light it will spread to the background. So… if our only light is a small spotlight, just off camera, then we will have harsh lighting on our subject’s face and a completely dark background. Whereas, if we are filming with a large light, far away from our subject, then we will have a soft light with a reasonably well lit background.

Lit using only a key light.
The next light we need is a fill light. It is typically darker and softer than our key light. We place a fill light on the other side of our subject’s face and it is used to fill in the shadows created by the key light. We don’t want to completely fill in the shadows, however. Shadows are good, we want shadows. You have to remember that our final image will only be in 2D. It is our job to create the depth. We don’t want our subject’s face to be completely lit across, without shadows, because it will look flat on screen. Faces are not flat. Therefore, we must manipulate the shadows to add dimension to the face and also to convey the mood of our film (i.e. pronounced shadows for a dramatic film and softer shadows for an uplifting piece).
The third light in our setup is called the hair or back light. This light is often overlooked, but it is very important. Going back to talking about adding depth, the point of the back light is to separate our subject from the background. It is typically pointed at the back of our subject’s head and it adds a bit of a halo effect to their hair – as if light is hitting our subject from an open sunroof above them.
The back light can be as simple as a $15 clamp light from a hardware store placed above them. We don’t have to worry as much about how harsh this light is because this light is not affecting our subject’s face.

Lit using key, fill, and back lights.
These are the basics to a quality interview lighting setup, but if we want to take it one step further then we should look at adding what’s known as a background light. A background light lights our background for the purpose of establishing our setting and giving our audience’s eyes something else to look at, if the interviewee runs on a little long. This light also makes sure that we are not filming a person in front of darkness and ensures that we do not have noise or grain in our background image. A background light can be a dedicated light, but it can also be as simple as turning on some overhead lights behind and far enough away from our subject that they will not affect our lighting setup.

Lit using key, fill, back, and background lights.
Images pulled from and recommended further reading: http://philipbloom.net/2011/12/14/dslrlighting/
Leave a Comment